Pure Cloud Installation requirements
- Prerequiste 1: DHCP server
- Prerequisite 2: Polycom phones connecting over the public internet
- Prerequiste 3 : Polycom phones connecting over an IP-VPN
- Prerequiste 4: net.Console (only via IP-VPN)
- Prerequisite 5 : Connect Me
- Prerequisite 6 : ATA over internet
- Prerequisite 7: Other devices over IP-VPN (to be completed)
Prerequiste 1: DHCP server
The use of a DHCP server is mandatory.Prerequisite 2: Polycom phones connecting over the public internet
Phone provisioning
In order for your phone to boot, it will need- A provisioning subdomain (Server Address): this is the address where the phone can fetch its configuration
- A provisioning user (Server User): the username to download its configuration
- A provisioning password (Server Password): the password to download its configuration
- Where to find the Server Address, the Server User and the Server Passwword?
- This information is normally provided by your project manager.
- In case you have full access (admin) the information is located under the profile "Template-SOP.Config" extension "sop000xxxxx"
- Administration Access > Provisioning authentication
- In case you bought IP331 refurbished, you must follow this procedure before using the option / 2 procedure
- Connect the phone to a switch to make sure it gets an IP
- Upgrade the phone from 4.0.2 towards 4.0.13 via the web interface (Utilities/Software Upgrade)
- Utilities > Software Upgrade
- Click on "Check for Updates"
- Select the latest version 4.0.13.x
- Click on "Install"
- Accept the different pop-up and the phone will reboot
- Change the NTP
- Preferences > Date & Time
- expend "time Synchronisation"
- change "sntp server to pool.ntp.org
- If the date and time is not correct, do it again
- When done, you will be able to follow the procedure described below
Option 1: Using the local DHCP server (preferred)
Alternatively, if the local DHCP server can be configured to add Option-160:- DHCP Option-160:
https://[Provisioning User]:[Provisioning Password]@[Provisioning subdomain]
https://purecloud11XX:[Provisioning Password]@purecloud11XXprovisioning.connect.fuzer.net Where
- XX = Pure Cloud client ID
- Provisioning Password is located is sopXXXXXXX (Sop.Config) extension on Fusion.
Option 2: Using the phone's web interface:
In case the customer cannot configure the option-160, you need to follow the following procedureStep A) Find the IP address of the phone
- Phone already up (easiest way):
- To find the IP address of an already booted phone, press the
- Home button > Settings > Status > Network > TCP/IP Parameters.
- During the boot process
- During the boot process of the phone :
- Press Cancel when the phone displays 'Starting application, press Cancel to interrupt.'.
- Then press 'About' multiple times until the phone has got his IP address.
- Then let the phone booted.
- During the boot process of the phone :
Step B) Configure
Connect to the phone using your browser and the following URL https://[ipaddress].- Enter the login "admin"
- Default password "456"
- In case the password is not correct you will have to make a factory reset
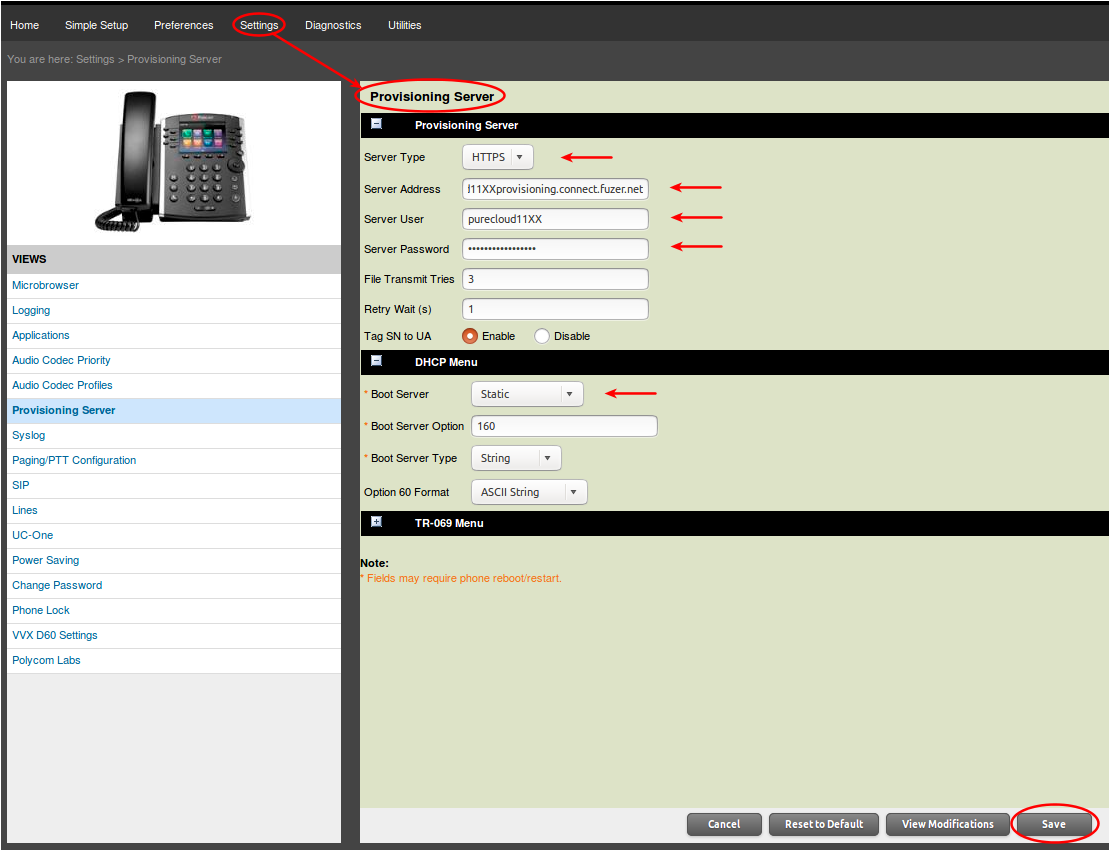
- Provisioning Server
- Server Type: HTTPS
- Server Address: [Provisioning subdomain]
- e.g. purecloud11xxprovisioning.connect.fuzer.net
- Server User: [Provisioning User]
- Server Password: [Provisioning Password]
- DHCP Menu
- Boot Server: Static
Option 3: Using the phone's user interface
Option 3a) Using the phone's user interface when the phone runs (easiest way):- From the phone's local menu interface, press Menu > Settings > Advanced (default password: 456) > Administration Settings > Network Configuration > Provisioning Server > DHCP Menu.
- Set the 'Boot Server' setting to 'Static'.
- Then return to the Provisioning Server menu and set the following settings:
- Server Type: HTTPS
- Server Address: [Provisioning subdomain]
- Server User: [Provisioning User]
- Server Password: [Provisioning Password]
- Press 'Back' two times then select 'Save Config' and press simultaneously the digits 1, 3 and 0 on the dial pad during some seconds in order to reboot the phone.
- During the boot process of the phone, press Cancel when the phone displays 'Starting application, press Cancel to interrupt.'. Press Setup. Enter the default password "456".
- Enter in the Provisioning Server menu. Then enter in the DHCP Menu, set 'Boot Server' to 'Static'. Press exit to quit the menu.
- Then from the Provisioning Server menu set the following settings:
- Server Type: HTTPS
- Server Address: [Provisioning subdomain]
- e.g. purecloud11xxprovisioning.connect.fuzer.net
- Server User: [Provisioning User]
- Server Password: [Provisioning Password]
- Press exit two times then select 'Save & Reboot' and press 'Select' to reboot the phone.
Routing information
If you want to send all internet traffic from Polycom phones via a dedicated internet line, please route all traffic for the following destinations via this line: 213.246.219.64/27 & 213.246.255.232/29 & 217.111.215.88/29 & 188.118.34.80/32 & 188.118.34.81/32 & 188.118.34.120/32 & 188.118.34.121/32 . The same approach can be used for Connect Me trafficFirewall settings
Here are the traffic flows used by Polycom phones over internet. It is the customer's responsibility to configure and manage their firewall. Recommended:| From | To | Protocol | Port | Explanation |
|---|---|---|---|---|
| Phone | * | UDP | NTP (123) | Time synchronization |
| Phone | * | TCP | SIP over TLS (The specific port(s) depend on your specific implementation. Please contact your project manager to know which one(s).) | Used for call signalling |
| Phone | * | UDP | (S)RTP (The specific port(s) depend on your specific implementation. Please contact your project manager to know which one(s).) | Used for call voice |
| Phone | * | UDP | DNS (53) | Used to convert hostnames to IP addresses |
| Phone | * | TCP | HTTPS (443) | Connection towards the Pure Cloud provisioning domain |
| From | To | Protocol | Port | Explanation |
|---|---|---|---|---|
| Phone | Customer's NTP server(s) | UDP | NTP (123) | Time synchronization |
| Phone | 213.246.219.64/27 & 213.246.255.232/29 & 217.111.215.88/29 & 188.118.34.80/32 & 188.118.34.81/32 & 188.118.34.120/32 & 188.118.34.121/32 | TCP | SIP over TLS (The specific port(s) depend on your specific implementation. Please contact your project manager to know which one(s).) | Used for call signalling |
| Phone | 213.246.219.64/27 & 213.246.255.232/29 & 217.111.215.88/29 & 188.118.34.80/32 & 188.118.34.81/32 & 188.118.34.120/32 & 188.118.34.121/32 | UDP | (S)RTP (The specific port(s) depend on your specific implementation. Please contact your project manager to know which one(s).) | Used for call voice |
| Phone | Customer's DNS server(s) | UDP | DNS (53) | Used to convert hostnames to IP addresses |
| Phone | 213.246.219.64/27 & 213.246.255.232/29 & 217.111.215.88/29 & 188.118.34.80/32 & 188.118.34.81/32 & 188.118.34.120/32 & 188.118.34.121/32 | TCP | HTTPS (443) | Connection towards the Pure Cloud provisioning domain |
Prerequiste 3 : Polycom phones connecting over an IP-VPN
The boot server IP address is different per client. Ask your project manager Have a look here to see what is needed to provision your phonesPrerequiste 4: net.Console (only via IP-VPN)
Routing
The PC on which the net.Console is running, should have access to the Pure Cloud platform and to the operator phone (Polycom IP650). As the phone and the PC might be in different vLANs, it might be necessary to set up routing between certain vLANsFirewall rules
Please note that the current IP ranges 213.246.219.64/27 & 213.246.255.232/29 & 217.111.215.88/29 & 188.118.34.80/32 & 188.118.34.81/32 & 188.118.34.120/32 & 188.118.34.121/32 could change or that IP ranges might be added or removed in the future. You will be informed if and when this happens and will need to change your firewall configuration.| From | To | Protocol | Destination port(s) |
|---|---|---|---|
| 213.246.219.64/27 & 213.246.255.232/29 & 217.111.215.88/29 & 188.118.34.80/32 & 188.118.34.81/32 & 188.118.34.120/32 & 188.118.34.121/32 | Phone | HTTP | TCP port 80 |
| PC | 213.246.219.64/27 & 213.246.255.232/29 & 217.111.215.88/29 & 188.118.34.80/32 & 188.118.34.81/32 & 188.118.34.120/32 & 188.118.34.121/32 | SIP over TCP for the control connection | TCP port 3040 |
| 213.246.219.64/27 & 213.246.255.232/29 & 217.111.215.88/29 & 188.118.34.80/32 & 188.118.34.81/32 & 188.118.34.120/32 & 188.118.34.121/32 | PC | SIP over TCP for the control connection | TCP port 3040 |
Prerequisite 5 : Connect Me
By default goes via the standard internet connection. If you want to make specific routing, see below what must be donereroute traffic via IPVPN (not mandatory)
If you want you can configure your network to reroute voice traffic coming from Connect me to use your IP VPN. See below what has to be done- The customer must route all traffic going Pure Cloud frontend via the Colt CPE
- The project manager will provide you the IP range
- In case the Colt CPE is in another network/vLAN than Connect Me, you need to specify which IP (in the same network/vLAN of the COLT CPE) will route the traffic towards this network.
reroute traffic via specific internet access (not mandatory)
If you want you can configure your network to reroute voice traffic coming from Connect me to use a specific internet access line. See below what has to be done- The customer must route all traffic going Pure Cloud frontend via the Colt CPE
- The project manager will provide you the IP range
- Verify whether or not the IT partner/manager is able to add the necessary routes to make sure traffic coming from Connect me uses this specific internet access line (and not the default one)
Prerequisite 6 : ATA over internet
How to configure an ATA over internet
- Connect the ATA on your network
- Identify the IP address of the AT. If you don't have access to your DHCP, follow this procedure
- STEP 1 Connect an analog phone to the Phone port of the ATA.
- STEP 2 Press the star key four times: **
- STEP 3 After the greeting plays, press the keys on the phone keypad to select your options :110#
- STEP 4 You will listen the IP address (English)
- Via a PC connected on the same LAN, connect to the web browser of the ATA (http://xxx.yyy.zzz.wwww)
- default login : admin
- default password : admin
- check the device version :
- Goto Status and check the Firmware version
- If Firmware version is lower than 1.4.1 SR2, upgrade the ATA
- Go to
- Download this file
- Select the file on your PC and push on upgrade
- The ATA will launch the upgrade and reboot
- You will have to log in again
- Set the provisioning URL
- Go to Voice > Provisioning:
- Set Transport Protocol to https
- Add provisioning URL in the field Profile Rule for fuzer the url is : https://spaprov.connect.fuzer.net/
- Reboot the ATA manually to enforce it to fetch the new configuration
Copyright © Fuzer SA